~~기록하기 위해 남기는 일기장~~
*코드베이스 초면인 사람이 되는대로 쓴거니 참고만 해주세요 :)*
01. SnapKit 추가
저번에 공부한 SnapKit을 활용하기 위해 import 해준다!
ViewController 파일에 기존 UIKit 아래쪽에 적어주면 끝
import UIKit
import SnapKit
SnapKit을 사용하는 이유?
: 코드를 더 직관적이고 간결하게 작성할 수 있다
[Swift 🍎] Snapkit 활용하기
snapkit 이란?코드베이스 UI 작성 시 제약조건 세팅하는 코드를 Snapkit을 활용해서 조금 더 간결하게 작성할 수 있게 하는 서드파티 라이브러리 아래와 같이 길어서 보기 힘든 코드를 ⤵️ 요렇게
solby.tistory.com
02. 버튼 클릭 시 값이 표시될 numBox 상수 선언
numBox는 값만 표시될 UI이므로 UILabel로 생성(사용 목적에 따라 잘 구분해 주기!)
configureUI 함수는 사용자 인터페이스(UI)를 설정한다
class ViewController: UIViewController {

    let numBox = UILabel()

    override func viewDidLoad() {
        super.viewDidLoad()
        configureUI()
    }
	//private 함수는 접근 제어자를 가지고 있으므로 이 함수가 속한 클래스나 구조체 외부에서는 호출할 수 없음
    private func configureUI() {
        view.backgroundColor = .black

        numBox.text = "0"
        numBox.textColor = .white
        numBox.font = UIFont.boldSystemFont(ofSize: 60)
        numBox.textAlignment = .right
numBox의 초기 텍스트는 0으로 설정
텍스트 컬러는 .white, 폰트는 SystemBold 60 적용 후 우측정렬
       //해당 코드 미작성 시 라벨이 보이지 않음
        view.addSubview(numBox)

        numBox.snp.makeConstraints {
            $0.height.equalTo(100)
            $0.top.equalTo(200)
            $0.leading.equalToSuperview().offset(30)
            $0.trailing.equalToSuperview().inset(30)
        }
view에 numBox를 추가해준 후 Constraints 설정
SnapKit 덕분에 제약조건 설정 코드가 많이 간결해졌다!!
03. 키패드가 될 버튼 만들어주기
키패드 숫자는 실제 클릭되어야하니까 UIButton으로 생성해준다
    //숫자
    let num1 = UIButton()

    num1.setTitle("1", for: .normal)
    num1.setTitleColor(.white, for: .normal)
    num1.titleLabel?.font = UIFont.boldSystemFont(ofSize: 30)
    num1.backgroundColor = .darkGray
    num1.frame.size.height = 80
    num1.frame.size.width = 80
    num1.layer.cornerRadius = 40
//사칙연산자
plus.setTitle("+", for: .normal)
plus.setTitleColor(.white, for: .normal)
plus.titleLabel?.font = UIFont.boldSystemFont(ofSize: 30)
plus.backgroundColor = .systemPink
plus.frame.size.height = 80
plus.frame.size.width = 80
plus.layer.cornerRadius = 40
Constraints는 추후 스텍뷰 생성 후 최종적으로 걸어줄 예정으로 패스한다!
키패드는 요러한 형태(4*4)가 되어야 하므로
- num1 8개 복사 후 0~9 생성
- plus 5개 복사 후 +, -, *, /, AC 생성
04. Horizontal StackView 생성
Horizontal StackView는 가로 스텍뷰이므로 아래와 같이 만들어둔 버튼들로 네개의 스택뷰 생성이 필요함
[ 7, 8, 9, + ] → temp1
[ 4, 5, 6, - ] → temp2
[ 1, 2, 3, * ] → temp3
[ AC, 0, =, / ]. → temp4
        temp1.axis = .horizontal
        temp1.backgroundColor = .black
        temp1.spacing = 10
        temp1.distribution = .fillEqually
만들어둔 버튼들을 addArrangeSubview로 각 스텍뷰에 넣어준다
        temp1.addArrangedSubview(num7)
        temp1.addArrangedSubview(num8)
        temp1.addArrangedSubview(num9)
        temp1.addArrangedSubview(plus)

        temp2.addArrangedSubview(num4)
        temp2.addArrangedSubview(num5)
        temp2.addArrangedSubview(num6)
        temp2.addArrangedSubview(minus)

        temp3.addArrangedSubview(num1)
        temp3.addArrangedSubview(num2)
        temp3.addArrangedSubview(num3)
        temp3.addArrangedSubview(multiply)

        temp4.addArrangedSubview(AC)
        temp4.addArrangedSubview(num0)
        temp4.addArrangedSubview(equal)
        temp4.addArrangedSubview(divide)
05. Vertical StackView 생성
세로 스텍뷰 생성 후 만들어둔 가로 스텍뷰 4개(temp1~4)를 넣어줌
        temp5.axis = .vertical
        temp5.backgroundColor = .black
        temp5.spacing = 10
        temp5.distribution = .fillEqually
temp5.addArrangedSubview(temp1)
temp5.addArrangedSubview(temp2)
temp5.addArrangedSubview(temp3)
temp5.addArrangedSubview(temp4)
최종으로 생성된 Vertical StackView의 Constraints를 설정해준다
view.addSubview(temp5)
temp5.snp.makeConstraints {
$0.top.equalTo(numBox.snp.bottom).offset(60)
$0.centerX.equalToSuperview()
$0.height.equalTo(350)
$0.width.equalTo(350)
}버튼의 bottom으로부터 60 떨어지게
뷰가 X축의 정 가운데 위치하게
가로(width) 세로(height)는 350으로 설정
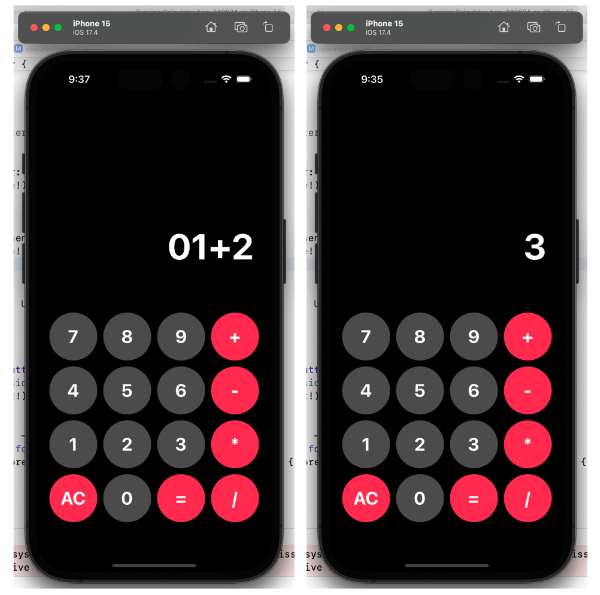
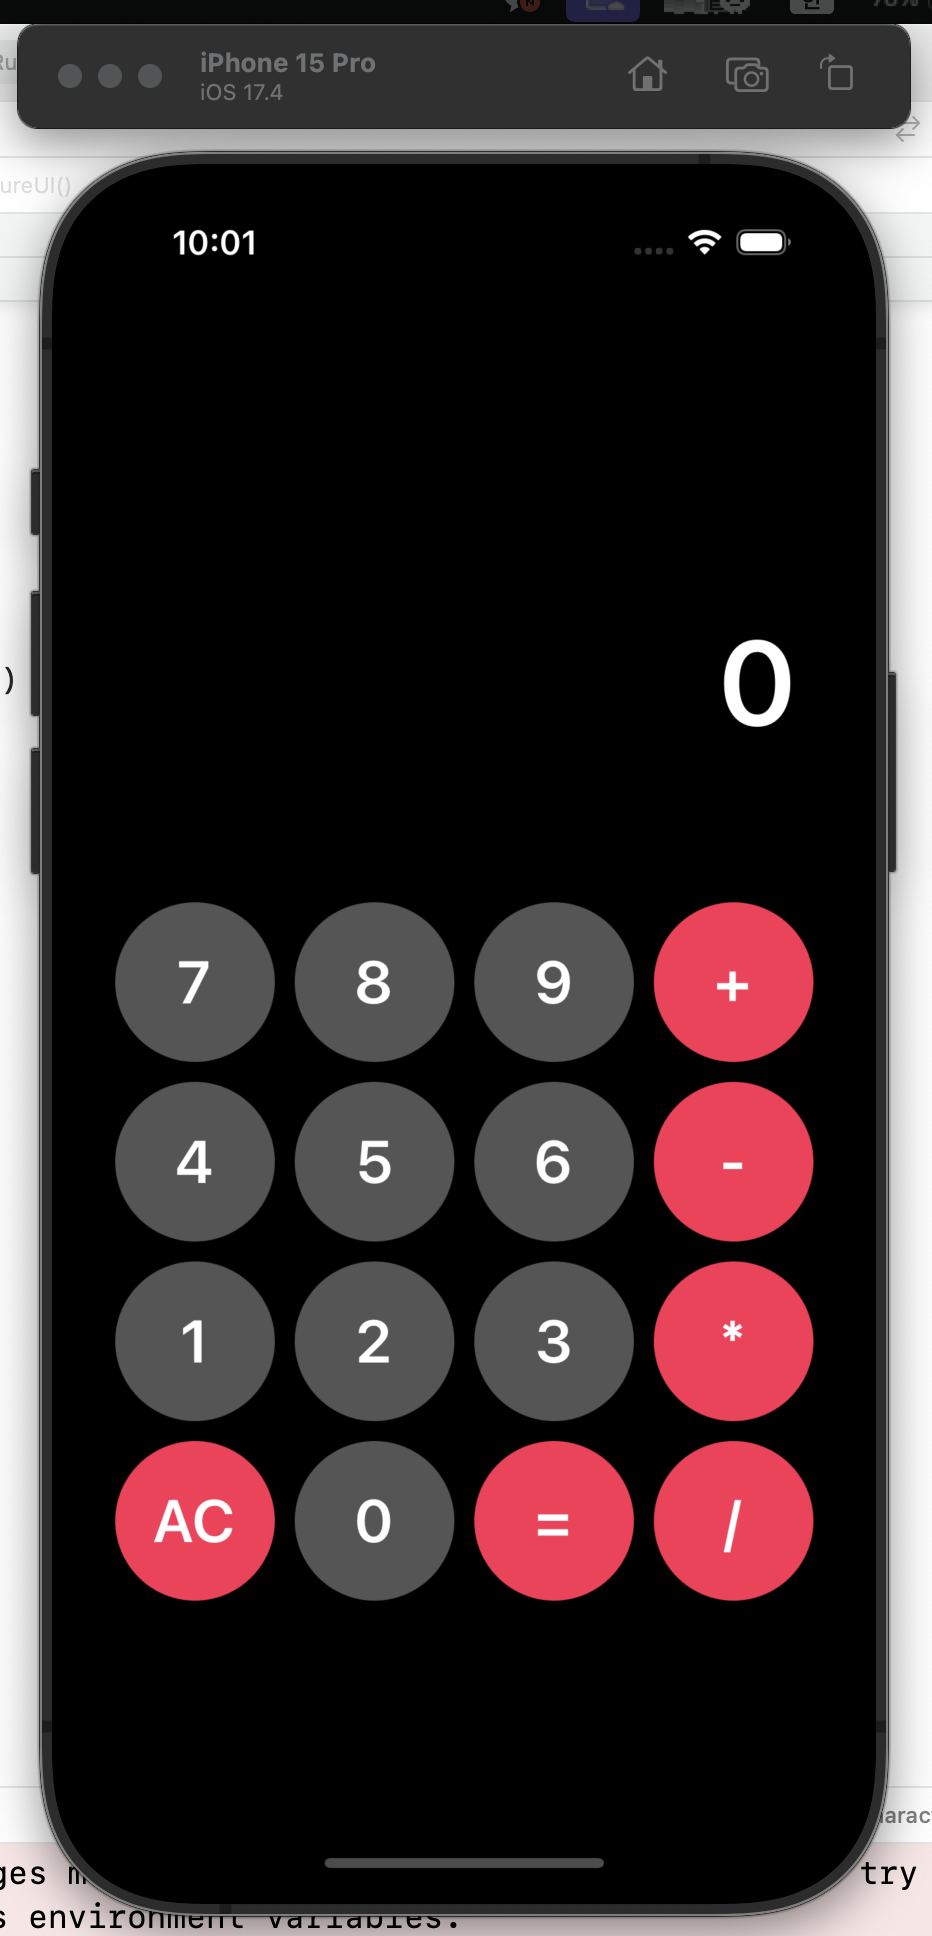
06. 최종 코드 및 확인
//
// ViewController.swift
// Calculator App_CodeBase_240626
//
// Created by 김솔비 on 6/26/24.
//
import UIKit
import SnapKit
class ViewController: UIViewController {
let numBox = UILabel()
let num7 = UIButton()
let num8 = UIButton()
let num9 = UIButton()
let plus = UIButton()
let num4 = UIButton()
let num5 = UIButton()
let num6 = UIButton()
let minus = UIButton()
let num1 = UIButton()
let num2 = UIButton()
let num3 = UIButton()
let multiply = UIButton()
let AC = UIButton()
let num0 = UIButton()
let equal = UIButton()
let divide = UIButton()
let temp1 = UIStackView()
let temp2 = UIStackView()
let temp3 = UIStackView()
let temp4 = UIStackView()
let temp5 = UIStackView()
override func viewDidLoad() {
super.viewDidLoad()
configureUI()
}
private func configureUI() {
view.backgroundColor = .black
numBox.text = "0"
numBox.textColor = .white
numBox.font = UIFont.boldSystemFont(ofSize: 60)
numBox.textAlignment = .right
num7.setTitle("7", for: .normal)
num7.setTitleColor(.white, for: .normal)
num7.titleLabel?.font = UIFont.boldSystemFont(ofSize: 30)
num7.backgroundColor = .darkGray
num7.frame.size.height = 80
num7.frame.size.width = 80
num7.layer.cornerRadius = 40
num8.setTitle("8", for: .normal)
num8.setTitleColor(.white, for: .normal)
num8.titleLabel?.font = UIFont.boldSystemFont(ofSize: 30)
num8.backgroundColor = .darkGray
num8.frame.size.height = 80
num8.frame.size.width = 80
num8.layer.cornerRadius = 40
num9.setTitle("9", for: .normal)
num9.setTitleColor(.white, for: .normal)
num9.titleLabel?.font = UIFont.boldSystemFont(ofSize: 30)
num9.backgroundColor = .darkGray
num9.frame.size.height = 80
num9.frame.size.width = 80
num9.layer.cornerRadius = 40
plus.setTitle("+", for: .normal)
plus.setTitleColor(.white, for: .normal)
plus.titleLabel?.font = UIFont.boldSystemFont(ofSize: 30)
plus.backgroundColor = .systemPink
plus.frame.size.height = 80
plus.frame.size.width = 80
plus.layer.cornerRadius = 40
num4.setTitle("4", for: .normal)
num4.setTitleColor(.white, for: .normal)
num4.titleLabel?.font = UIFont.boldSystemFont(ofSize: 30)
num4.backgroundColor = .darkGray
num4.frame.size.height = 80
num4.frame.size.width = 80
num4.layer.cornerRadius = 40
num5.setTitle("5", for: .normal)
num5.setTitleColor(.white, for: .normal)
num5.titleLabel?.font = UIFont.boldSystemFont(ofSize: 30)
num5.backgroundColor = .darkGray
num5.frame.size.height = 80
num5.frame.size.width = 80
num5.layer.cornerRadius = 40
num6.setTitle("6", for: .normal)
num6.setTitleColor(.white, for: .normal)
num6.titleLabel?.font = UIFont.boldSystemFont(ofSize: 30)
num6.backgroundColor = .darkGray
num6.frame.size.height = 80
num6.frame.size.width = 80
num6.layer.cornerRadius = 40
minus.setTitle("-", for: .normal)
minus.setTitleColor(.white, for: .normal)
minus.titleLabel?.font = UIFont.boldSystemFont(ofSize: 30)
minus.backgroundColor = .systemPink
minus.frame.size.height = 80
minus.frame.size.width = 80
minus.layer.cornerRadius = 40
num1.setTitle("1", for: .normal)
num1.setTitleColor(.white, for: .normal)
num1.titleLabel?.font = UIFont.boldSystemFont(ofSize: 30)
num1.backgroundColor = .darkGray
num1.frame.size.height = 80
num1.frame.size.width = 80
num1.layer.cornerRadius = 40
num2.setTitle("2", for: .normal)
num2.setTitleColor(.white, for: .normal)
num2.titleLabel?.font = UIFont.boldSystemFont(ofSize: 30)
num2.backgroundColor = .darkGray
num2.frame.size.height = 80
num2.frame.size.width = 80
num2.layer.cornerRadius = 40
num3.setTitle("3", for: .normal)
num3.setTitleColor(.white, for: .normal)
num3.titleLabel?.font = UIFont.boldSystemFont(ofSize: 30)
num3.backgroundColor = .darkGray
num3.frame.size.height = 80
num3.frame.size.width = 80
num3.layer.cornerRadius = 40
multiply.setTitle("*", for: .normal)
multiply.setTitleColor(.white, for: .normal)
multiply.titleLabel?.font = UIFont.boldSystemFont(ofSize: 30)
multiply.backgroundColor = .systemPink
multiply.frame.size.height = 80
multiply.frame.size.width = 80
multiply.layer.cornerRadius = 40
AC.setTitle("AC", for: .normal)
AC.setTitleColor(.white, for: .normal)
AC.titleLabel?.font = UIFont.boldSystemFont(ofSize: 30)
AC.backgroundColor = .systemPink
AC.frame.size.height = 80
AC.frame.size.width = 80
AC.layer.cornerRadius = 40
num0.setTitle("0", for: .normal)
num0.setTitleColor(.white, for: .normal)
num0.titleLabel?.font = UIFont.boldSystemFont(ofSize: 30)
num0.backgroundColor = .darkGray
num0.frame.size.height = 80
num0.frame.size.width = 80
num0.layer.cornerRadius = 40
equal.setTitle("=", for: .normal)
equal.setTitleColor(.white, for: .normal)
equal.titleLabel?.font = UIFont.boldSystemFont(ofSize: 30)
equal.backgroundColor = .systemPink
equal.frame.size.height = 80
equal.frame.size.width = 80
equal.layer.cornerRadius = 40
divide.setTitle("/", for: .normal)
divide.setTitleColor(.white, for: .normal)
divide.titleLabel?.font = UIFont.boldSystemFont(ofSize: 30)
divide.backgroundColor = .systemPink
divide.frame.size.height = 80
divide.frame.size.width = 80
divide.layer.cornerRadius = 40
temp1.axis = .horizontal
temp1.backgroundColor = .black
temp1.spacing = 10
temp1.distribution = .fillEqually
temp2.axis = .horizontal
temp2.backgroundColor = .black
temp2.spacing = 10
temp2.distribution = .fillEqually
temp3.axis = .horizontal
temp3.backgroundColor = .black
temp3.spacing = 10
temp3.distribution = .fillEqually
temp4.axis = .horizontal
temp4.backgroundColor = .black
temp4.spacing = 10
temp4.distribution = .fillEqually
temp5.axis = .vertical
temp5.backgroundColor = .black
temp5.spacing = 10
temp5.distribution = .fillEqually
//해당 코드 미작성 시 라벨이 보이지 않음
view.addSubview(numBox)
numBox.snp.makeConstraints {
$0.height.equalTo(100)
$0.top.equalTo(200)
$0.leading.equalToSuperview().offset(30)
$0.trailing.equalToSuperview().inset(30)
}
view.addSubview(temp5)
temp5.snp.makeConstraints {
$0.top.equalTo(numBox.snp.bottom).offset(60)
$0.centerX.equalToSuperview()
$0.height.equalTo(350)
$0.width.equalTo(350)
}
temp1.addArrangedSubview(num7)
temp1.addArrangedSubview(num8)
temp1.addArrangedSubview(num9)
temp1.addArrangedSubview(plus)
temp2.addArrangedSubview(num4)
temp2.addArrangedSubview(num5)
temp2.addArrangedSubview(num6)
temp2.addArrangedSubview(minus)
temp3.addArrangedSubview(num1)
temp3.addArrangedSubview(num2)
temp3.addArrangedSubview(num3)
temp3.addArrangedSubview(multiply)
temp4.addArrangedSubview(AC)
temp4.addArrangedSubview(num0)
temp4.addArrangedSubview(equal)
temp4.addArrangedSubview(divide)
        temp5.addArrangedSubview(temp1)
        temp5.addArrangedSubview(temp2)
        temp5.addArrangedSubview(temp3)
        temp5.addArrangedSubview(temp4)
}
}
+ 프리뷰 설정 꿀팁
램 딸려서 못 쓰는데 요거 쓰면 실시간으로 UI 확인하면서 코드베이스 제작이 가능하다고 한다 ..
#Preview{
    let vc = ViewController()
    return vc
}'💻 스파르타코딩클럽 > 개인 과제' 카테고리의 다른 글
| [개인과제] 연락처 앱 만들기 2️⃣ (0) | 2024.07.17 |
|---|---|
| [개인과제] 연락처 앱 만들기 1️⃣ (1) | 2024.07.16 |
| [개인과제] 약식 계산기 만들기 - 스토리보드 (0) | 2024.06.27 |
| [개인과제] 카운터앱 만들기 (0) | 2024.06.24 |
| [개인과제] 야구게임 만들기 (0) | 2024.06.17 |


